

Dumb Computer
Creating a single purpose Linux computer for taking notes


Difficulty: Hard
Skills: Bootloaders, Operating Systems, Hard Drives, Drivers
Time: 2 weeks of research and configuration
Original Project Longevity: 1/10, without a WiFi driver I have had syncing issues. Right now I don’t have a good place where I can charge the computer while its connected to Ethernet so those two things happen separately and with a poor battery I find the computer is often either dead or out of sync.
Reworked Project Longevity: ?/10, I ditched my mac and redid this project on an old Dell with a working WiFi driver. Time will tell if its a better solution.
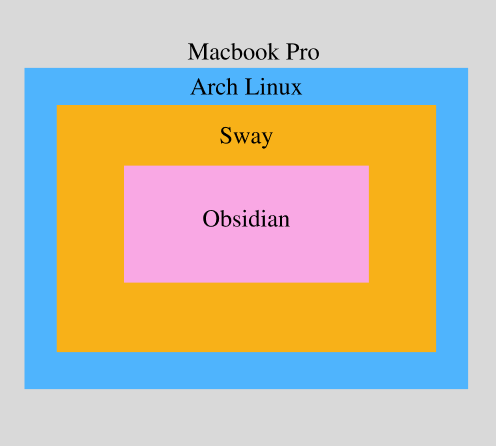
You've heard of dumb phones but have you heard of dumb computers? Neither had I, but it seemed like a fitting name for what I wanted: a distraction free note-taking computer that syncs with my main computer. I imagine myself grabbing my dumb computer before bed when I just want to organize and write. I made one by installing Arch Linux on an old Macbook Pro. This article is a conceptual overview of how I did it including my design and some takeaways. If you're looking for a guide I recommend the official arch installation guide and discussing everything you don't understand with an LLM. Here’s how it turned out:
Some early design direction
I'd initially thought to use a Raspberry Pi but realized, repurposing an old laptop would give me the best form factor.
I'd come across electronic typewriters like Freewrite but, I wanted the dumb computer to seamlessly sync with my existing note taking app Obsidian so building it myself made the most sense.
It was not yet clear to me what was needed to make my dumb computer distraction free. I did know that I didn't want a browser and preferred that Obsidian be the only app installed. The rest I would figure out.
The Design
My chosen design was to install Arch Linux on my old Macbook Pro. Arch installs without a Desktop Environment, meaning at first all you can use is a terminal, which was important to me because I wanted to launch a single app and limit additional functionality. I planned to configure the ~/.xinitrc file to launch Obsidian at startup without a Windows Manager. To sync Obsidian I planned on paying the $8/month for Obsidian Sync.
Definitions
Arch - a lightweight DIY Linux distribution.

Arch ISO - the installer for Arch.

Volume - a partition of your hard drive formatted with a filesystem like FAT32 or Ext4

EFI - boots the Volume that contains your operating system.

Driver - firmware that allows your operating system to use your hardware

Package Managers - command line tools for downloading and installing software.

Desktop Environment - the software that creates the GUI desktop that you use to navigate between apps on your computer. Usually includes a Windows Manager and toolbar.

Windows Manager - floating or tiling, how your app windows are displayed and navigated.

X11 vs. Wayland- the old Linux desktop protocol vs. the new Linux desktop protocol. The transition is ongoing. It determines which Windows Managers are available to use. For instance, if you choose X11 you can use the classic i3 tiling WM, if you choose Wayland you can use Sway which is an i3 clone for Wayland.
Lessons Learned
My only previous experience with Linux was using Red Hat Enterprise Linux Server from a terminal so I wasn't sure what a Desktop Environment or Windows Manager were when I started. I'd need to figure this out as well as the difference between X11 and Wayland and Linux permissions in order to complete the project. However my largest conceptual gap was understanding how an Operating System is installed and is started up.
Installing Arch
1. Arch isn't available for download, you have to torrent it. This involves downloading a torrent file which is like an order form that says "I'd like this version of Arch" and using a torrent client that will match you with someone(s) who has the actual Arch ISO.
2. If you're installing Linux on a Mac none of your hardware will work out of the box because Macs require special drivers that aren't in the base Arch install. In my case, my keyboard, mouse, touch bar, and wifi were all broken out of the box. This was tricky because my Mac only had two USB-C ports and I needed four: one for internet, one for power (so my work session wasn't interrupted), one for the external keyboard, and one for the USB stick with the ISO. Interestingly, the Arch ISO didn't recognize USB ports and ethernet routed through a Lenovo dock but did recognize them through a multi-port adapter. I'd guess the Lenovo dock requires some extra driver.
3. Installing an Operating System isn't like installing any other software because you need a way to configure the operating system outside of any existing operating system. An ISO allows you to do this. It loads into RAM via the EFI and let's you configure and then mount the new Arch installation. Importantly, until you mount the install to disk, your configurations changes are all stored in RAM and will not persist.
4. I mentioned that the ISO uses the EFI to load, what exactly is the EFI? It's a small section of your disk in charge of starting up your computer. By default it will start up macOS but I can interrupt it by holding the option key on startup and select for myself. That's exactly what you do when you run the arch ISO: startup the computer, hit option, select the ISO to run instead of running macOS. Know that you don't need to make a new EFI because you can just use the one that comes with your Mac and that you can change the boot order so that your Arch install starts up automatically but you can still access your old macOS installation. Finally, though the EFI has a simple filesystem called FAT32 you'll need to format the volume you're using for your Arch install as Ext4.
6. Package managers vary depending on where you are and what you need. I was confused when I saw some instructions telling me to use pacstrap, others to use pacman, and still others to use yay. I learned that pacstrap is used to install official repositories on the root installation while within the ISO environment whereas pacman is used to install official repositories on root from root. yay can be used to install packages from the Arch User Repository which is where I found Obsidian and SyncThing.
Installing Obsidian
I struggled to get Obsidian to open and don't really understand my solution but some mystery keeps life interesting. I tried using flatpak which provides a sandbox in which apps run but only got Obsidian to open when running via flatpak with the --no-sandbox flag.
Configuring a minimalist computer
Minimalist to me meant giving the illusion of a single application computer while also giving me the ability to change the configuration if needed.
Here's out it works. When the computer turns on a login terminal appears, logging in automatically runs ~/.bash_profile which contains instructions to start up sway. Following the sway config at ~/.config/sway/config sway startsup and runs Obsidian via flatpack. As you can see in the video the result is that Obsidian opens on the first Sway window. When I want to change the configuration I use Cmd+2 to open a new Sway window and Cmd+Enter to open a terminal. I didn't end up using a Desktop Manager. Apple chose to put a rarely used Broadcom WiFi chip into this computer and I was unable to find a working WiFi driver for it. Perhaps having Ethernet only will add to the minimalist computer experience or perhaps it will be an inconvenience. Time will tell. When I'm done typing my notes I plug the computer into an ethernet to usb-c cable and sync up.
SyncThing instead of Obsidian Sync
As for how the syncing works, I decided to see if I could save some money and set up SyncThing which is free and came heavily recommended. Now my computers talk to each other to keep notes in sync. Unfortunately, SyncThing uses a locally hosted website for its configuration screen and I needed Firefox to use it. I installed Firefox, configured SyncThing and uninstalled it. Icky!
Reflections and Optional Future Work
- Incremental Development: Before starting in earnest I confirmed I could get my "single-app setup" by running i3 and Obsidian on a Raspberry Pi. I also wanted to test out the whole Arch install but didn't have the space for it on my Pi. I tried to test Arch on Parallels but my M2 chip got in the way. It may have been smart to try Arch on a Windows Computer first where I wouldn't have faced the driver issues.
- Creating a low permissioned user: I could have made downloading and using a browser more difficult by installing Obsidian on a locked down user and only giving the root user the ability to install new programs. This might be the kind of thing you'd do if you were a parent creating this dumb computer for a child.
- Disabling the mouse: It's possible to disable the mouse, which would make doing anything other than taking notes harder and be pretty rad in the emacs/vim sense of the word. Unfortunately, Obsidian isn't great with Keyboard Commands. I still may try this in the future.
- Blue light mode: I may end up adding a blue light blocker or turning the screen grayscale to make my it easier on the eyes before bed.
- Battery: The battery kinda sucks on this. I saw a video of replacing an old Macbook battery and might consider doing it in the future.
Final Thoughts
I've been using my dumb computer for about two weeks and like it so far but if I'm being honest I like all new technology for about a month. I'm interested to see if it will have staying power as a daily, well nightly, driver. This project taught me a lot about installing operating systems that I missed when using already written Terraform configurations at my old job. I'm glad I did it!